Web services performance testing: a pilgrim’s progress. Part 4.

I have SoapUI Pro from SmartBear at my disposal at work, and I’m quite comfortable with it. So it was my tool of choice for creating load and recording details about the results.

SoapUI’s first cousin LoadUI, a free version of which comes with the SoapUI Pro install, was also an option. However, I chose not to explore it for this testing mission. (A road not travelled, admittedly.)

My first load tests sent requests to the middleware Web services described in Part 3 of this series. Because of our NTLM proxy at work I had to use Fiddler to do the handshake between my desktop and the Web services.

Fiddler records a lot of interesting information about Web service requests, including response times and bytesize. So I copied that data from Fiddler, pasted it into Excel, and created time-series graphs from that data. I was able to create some pretty graphs, but copying and pasting the data over and over got to be a real time sink. I am not and will never be a VBA whiz, so I knew I had to find a better way.

I was forced into finding that better way when it came time to test the performance of the .NET services that USED the middleware Web services. Because of the .NET Web server’s configuration, I could no longer route requests through Fiddler and see the data. What seemed to be a hindrance turned out to be a blessing in disguise.

The solution I arrived at was to use SoapUI to record several aspects of the request and response transactions to a flat file. I could then bring that flat file into R for graphing and analysis.

The SoapUI test case for the .NET services is set up as follows. Apologies for the blurriness of some images below: I haven’t done HTML-based documentation in quite some time.

  1. Initial request to get the service “warmed up.” I do not count those results.
  2. Multipurpose Groovy script step.
  3. // I am registering the jTDS JDBC driver for use later in the test case. See below for info on using third-party libraries.

    import groovy.sql.Sql
    com.eviware.soapui.support.GroovyUtils.registerJdbcDriver( "net.sourceforge.jtds.jdbc.Driver" )

    //Get the time now via Joda to put a time stamp on the data sink filename.

    import org.joda.time.DateTime
    import org.joda.time.LocalDate

    def activeEnvironment = context.expand( '${#Project#activeEnvironment}' )

    def now = new DateTime().toString().replaceAll("[\\W]", "_")

    // Construct the file name for response data and set the filename value of a Data Sink set further along in the test.

    testRunner.testCase.getTestStepByName("Response Size and Time Log").getDataSink().setFileName('''Q:/basedirectory/''' + activeEnvironment + '''_''' + now + '''_responseTimes.csv''')

    If your Groovy script uses third-party libraries like jTDS and Joda, you have to put the jar files into $soapui_home/bin/etc.

    Putting jars where SoapUI can see them.

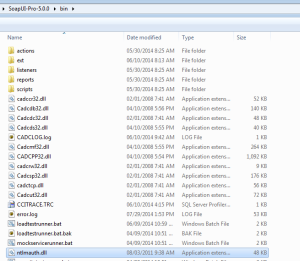
    Note that jTDS has an accompanying DLL for SQL Server Windows-based authentication. DLLs like this go in $soapui_home/bin.

    Putting DLLS where SoapUI can see them.

    This is how you set an activeEnvironment variable: setup happens at the project level:

    Creating environments at the project level.

    Then you choose your environment at the test suite level.

    Choosing environment in the test suite.

  4. Run a SQL query in a JDBC DataSource step to get a random policy number from the database of your choice on the fly. You can create your SQL query for the DataSource step dynamically in a Groovy script.
  5. // State Codes is a grid Data Source step whose contents aren't shown here.

    def stateCode = context.expand( '${State Codes#StateCode}' )

    testRunner.testCase.getTestStepByName("Get A Policy Number").getDataSource().setQuery("SELECT top 1 number as PolicyNumber FROM tablename p where date between '1/1/2012' and getdate() and state = '" + stateCode + "' order by newid()")

  6. Here’s the JDBC data source for the policy numbers.The query (not shown) is fed over from the preceding Groovy script step.
  7. JDBC DataSource step.

    You will have to set your connection properties. Your connection string for jTDS might look something like this. For more information about jTDS, see the online docs.

    jdbc:jtds:sqlserver://server:port/initialDatabase;domain=domainName;
    trusted_connection=yes
  8. I feed the value of PolicyNumber returned by the SQL query to my SOAP request via a property transfer.
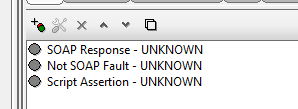
  9. I have a few assertions in the SOAP request test step. The first two are “canned” assertions that require no scripting.
  10. Assertions in SOAP request.
    The third SOAP request assertion, which is more of a functional script than it is an assertion, captures the timestamp on the response as well as the time taken to respond. These are built-in SoapUI API calls. The properties TimeStamp and ResponseTime are created and initialized in this Groovy script – I didn’t have to create them outside the script (for example, at the test step level).

    import org.joda.time.DateTime

    targetStep = messageExchange.modelItem.testStep.testCase.getTestStepByName('Response Size and Time Log')
    targetStep.setPropertyValue( 'TimeStamp', new DateTime(messageExchange.timestamp).toString())
    targetStep.setPropertyValue( 'ResponseTime', messageExchange.timeTaken.toString())

  11. Another Groovy script step to get the size in bytes of the response:
  12. def responseSize = context.expand( '${Service#Response#declare namespace s=\'http://schemas.xmlsoap.org/soap/envelope/\'; //s:Envelope[1]}' ).toString()

    responseSize.length()

  13. Yet another Groovy script step to save responses as XML in a data sink, with policy number, state code, and active environment as the filename:
  14. def policyNumber = context.expand( '${Service#Request#declare namespace urn=\'urn:dev.null.com\'; //urn:Service[1]/urn:request[1]/urn:PolicyNumber[1]}' )

    def stateAbbrev = context.expand( '${Service#Response#declare namespace ns1=\'urn:dev.null.com\'; //ns1:Service[1]/ns1:Result[1]/ns1:State[1]/ns1:Code[1]}' )

    def activeEnvironment = context.expand( '${#Project#activeEnvironment}' )

    testRunner.testCase.getTestStepByName("DataSink").getDataSink().
    setFileName('''B/basedirectory/''' + policyNumber + '''_''' + stateAbbrev
    + '''_''' + activeEnvironment + '''.xml''')

  15. Some property transfers, including a count of policy terms (see part 3 of this series) in the response:
  16. Property transfers.

  17. DataSink to write the response XML to a file. The filename is set in step 7 above.
  18. File DataSink step.

  19. DataSink to write information relevant to performance to a CSV whose name is set on the fly. The filenames and property values come from the steps above.
  20. Response properties DataSink step.

  21. Don’t forget a delay step if you’re concerned about overloading the system. (Note that you can configure delays and threading more precisely in LoadUI. This test case, like all SoapUI test cases that aren’t also LoadTests, is single-threaded by default.)
  22. Delay step.

  23. And of course a DataSource Loop.
  24. DataSource Loop step.

  25. The whole test case looks like this:
  26. Whole test case.

  27. And now I have a CSV with response times, bytesizes, policy risk states, and term counts to parse in the tool of my choice. I chose R. More about that later.

Web services performance testing: a pilgrim’s progress. Part 3

This particular blog series is probably going to take me as long to finish as it did the medieval Muslim residents of al-Andalus to make a Hajj. So the “pilgrim” in this blog series title is apt.

It’s easy enough to set up a “load test” in a testing tool. It’s a little more challenging to frame the questions you want to ask about performance.

The services whose performance I was testing request data on policies that vary by insured risk state. The policy data resides in an IBM z/OS mainframe system and Datacom databases. The architecture works something like this:

  • .NET Web service request for policy data is made
  • Request is routed through middleware Web services that scrape mainframe screens or query Datacom
  • Middleware Web service returns policy data, or a SOAP fault, to .NET
  • .NET passes back the data to the requestor as XML

The team was especially concerned about the performance of the components that scraped the screens. Screen scraping can be slow, and our code would be sharing the subsystem that scrapes the data with a finicky Java messaging framework. Also, the middleware in question is very much due for an upgrade.

After thinking about these issues as well as some consultation with the project team, I designed my performance tests to record:

  • Response time in milliseconds per request
  • The risk state of the policy data being requested
  • The number of policy terms in the response: the usual number is two but the minimum number is one when the request is successful. If two terms are present, the number of screens that needs to be scraped doubles.
  • The size in bytes of the response. It is possible that a single-term response could be as large or larger than a two-term response in some cases, depending on the amount of data per mainframe screen and whether certain screens were used for that policy.

I made a couple more decisions based on the fact that I was testing in production (see part 1 of this series).

  • Requests would be made every 30 to 60 seconds over a period of a couple of hours for a total of 200 or so. Earlier tests at a higher frequency did not always go well (the aforementioned Java messaging framework was a rather feeble canary in the coal mine).
  • The team felt that the volume of requests (one or two a minute) was a realistic prediction of actual production load. The static frequency is not realistic, but my concern was again to avoid interfering with other production usage.
  • I felt that a sample size of 200 was “decent.” Since prod support staff had to monitor the production systems as I ran the test, a run time of anything over a couple of hours would not have been reasonable.

In the next posts I’ll review how I recorded and reported on data using SoapUI, Groovy, and the R statistics language.

Easy peasy emails from SoapUI test cases to you

As a sophomore-level programming autodidact, I’m on an ongoing quest to bootstrap my test automation with SmartBear‘s venerable SoapUI. You can script SoapUI as heavily as you want to with the Groovy programming language. Or you can use SoapUI’s built-in GUI elements to reduce your programming work. For example, it can be a simple matter to let SoapUI consume your project WSDL and build out a request for you… and then display the incoming response in an easy-to-read form. Or you can use groovy-wslite to start you off on the same road, but it may take you longer to write the code yourself and might not yield you any richer results.

I really wanted SoapUI to email me a simple text message when a test ended. I’d already written and tested a Groovy class that used Apache Commons’ multipart email capabilities. However, I wasn’t sure how to use that class in SoapUI. After some Googling and experimenting, here’s how I got the whole thing working today.

  1. I pointed SoapUI’s script library to the folder that contained my .groovy file with the class definition.* The sixth entry on the right in the image below takes a folder location.
    Inline image 1
  2. I dropped the Apache commons.email jar into $SoapUI_home/bin/ext, otherwise known as the bin/ext directory in your SoapUI installation folder.  (Hat tip to Saurabh Gupta for this pointer.) I would imagine that putting it into $SoapUI_home/lib would work just as well, since that’s where the SoapUI installer puts a lot of the other Apache libraries.
  3. For this test case, I wanted to record all my pass/fails and email myself at the end. So I put the following code into the setup script for the test case. The setup script window is visible at the bottom of the test case GUI in SoapUI.
    context.scriptResultsList = [] // List to hold pass/fails
    context.email // to be initialized later
  4. Later in the test case, a Groovy script checks one XML file against another and records “PASS” if they’re identical, “FAIL” if not, and adds the “PASS” or “FAIL” string as a list item to the scriptResultsList context variable defined in the test case setup script.
    if (xmlDiff.identical()) {
       scriptResult = 'PASS'  
     }
     else {
       scriptResult = 'FAIL'
    }
    context.scriptResultsList << scriptResult
  5. In the teardown script for the test case, I call my email class by attaching it to the context.email variable I created in the setup script. I send an email whose text depends on whether any of my test cases failed. I could attach a results file with a little more work.
    if ( context.scriptResultsList.find {it == 'FAIL'} ) {
    context.email = new ApacheMultiPartEmail("", "", "", 
    "Failure: SoapUI Regression Test", "At least one of your 
    test runs failed. Check detailed results.", 
    "recipient@blarg.net")
    }
    else {
    context.email = new ApacheMultiPartEmail("", "", "", 
    "Pass: SoapUI Regression Test", 
    "None of your test runs failed.", 
    "recipient@blarg.net")
    }

* Here’s my email class definition, which closely resembles the example in the Apache Commons online docs. It was written to send emails via an Exchange SMTP server. Note that Apache Commons also offers a SimpleEmail class that would have worked just as well for this limited purpose.

import org.apache.commons.*;
public class ApacheMultiPartEmail {
public ApacheMultiPartEmail(attPath, attDescription, attName, msgSubject, msgMessage, msgRecipient) {
if (attPath != '' && attDescription != '' && attName != '') {
EmailAttachment attachment = new EmailAttachment();
attachment.setPath(attPath);
attachment.setDisposition(EmailAttachment.ATTACHMENT);
attachment.setDescription(attDescription);
attachment.setName(attName);
email.attach(attachment);
}

Email email = new MultiPartEmail();
email.setHostName("smtp.yourhostname.org"); // I hardcode this
email.setSmtpPort(yoursmtpport); // also hardcoded in the class definition
email.setFrom("desiredSenderEmailAddress"); //I hardcode this value in the class always to send the message from me. You could pass it in as a parameter too. 
email.setSubject(msgSubject);
email.setMsg(msgMessage);
email.addTo(msgRecipient);

email.send();
}
}

Big data technology for absolute beginners: a meetup report

After years of reading-intensive formal education, I’ve come to the conclusion that I’m actually best at hands-on learning. You can talk to me till next year about technical concepts but until I can see them in action, they often don’t make much sense to me. That’s why this morning’s Boston Data Mining meetup was so valuable: we worked directly with an Amazon Web Services Elastic MapReduce cluster and an AWS Redshift database. Once you can make those connections, the learning opportunities are probably boundless.

The good people of Data Kitchen (Gil Benghiat, Eric Estabrooks, and Chris Bergh) first gave us high-level overviews of Hadoop, AWS EMR (Amazon’s branding of Hadoop), Redshift, and associated frameworks like Impala. Also covered at a high level were MapReduceHive and Pig, which you can use to retrieve data from a Hadoop/AWS EMR cluster. Each technology has its strengths and weaknesses, and the DK guys gave some expert advice in those areas too. Questions from the 50+ people in the room were of high quality and brought up some good discussion points. Also on hand with deep subject matter expertise and critical helpful hints for newbs like me was William Lee of Imagios.

Before long it was time to try connecting to an AWS EMR cluster. Setup for these connections is not a trivial matter, but fortunately there were good instructions posted on the DK blog before the meetup convened. Amazingly, even though many people arrived at the meetup without having completed the setup prerequisites, and all three major desktop O/S were well represented in the crowd, most people were able to run a SQL query against an AWS EMR cluster by the end of the morning. Yes, even me. (My biggest challenge was trying to get SQL Workbench to run on Debian without gnome or KDE installed. FOSS and I have a Stockholm syndrome type of relationship. Long story short, make sure you have one of those desktop environments installed before you try to use SQL Workbench on Linux.)

The Data Kitchen guys and William Lee also put in a few extra hours to make sure we all could put together a Redshift database to which we could connect from our desktops. I was flabbergasted that I was able to get up and running with the AWS technologies for a couple of cents on the dollar. Last week I enrolled in an online Hadoop course that promised I could run labs in the cloud, only to find out after the first couple of lectures that there was no cloud and that the desktop software I would need required a six-core processor at a minimum. Needless to say, I quickly unenrolled from the course.

You can create an AWS EMR cluster that costs a few cents an hour to run. The configuration options you choose during cluster creation apparently can affect the price greatly, so be careful. (The Data Kitchen slides provided specific information on this point.) Also critical: if you’re not going to keep using the EMR cluster or Redshift database you create, remember to terminate it (EMR) or shut it down (Redshift), or face a big credit card bill later. Another great thing for us cheapskates: public big data is only a Google away.

Slides from the workshop will be posted to Slideshare – I would imagine that Data Kitchen will announce the postings on their blog. All told, this was a morning well spent. My lunchtime visit to Tatte Bakery on 3rd Street didn’t hurt.